
How to propagate an orchids – dividing, cutting and growing from seed
Our site is reader supported, this means we may earn a small commission from Amazon and other affiliates when you buy through links on our site.
As with most plants, orchids can reproduce sexually through seeds and asexually through vegetative options such as dividing plants and, my favourite taking cuttings. As it’s difficult to propagate an orchid through seeds, I usually recommend people propagate by division and taking cuttings. I’ll start this article with the latter two methods as they’re easier and more likely to produce new orchids.
Division
Division is the easiest method to propagate an orchid. But unfortunately, not all orchids can be divided. Look for orchids that grow sideways, such as the Dendrobium species, as they have new stems growing next to the old and are easily split apart.
In division, the original plant is split into two or more plants. This is best done when you’re repotting your orchid as it has to leave the pot then anyway. This method gives you full-grown orchids, which are the same as the original plant, as you’re just cutting parts off of it.
How to divide your orchid
While this is the easiest method to propagate your orchid to ensure new growth, it’s still quite tricky to perform.
Divide your orchid at repotting time – that is after or before it’s flowered. But note that doing this means that you won’t get any flowers on the parent plant for that year.
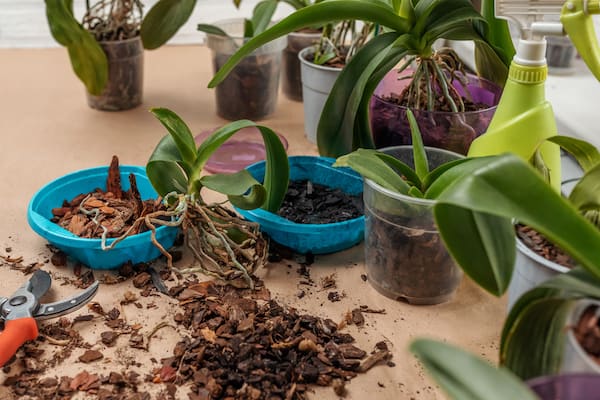
The first step is to sterilise your cutting knife and unpot your orchid onto newspaper on your table. Then look for ‘pseudobulbs’. These are bulb-like growths on the main underground stem and should appear to be mature. Cut the stem into sections of about eight to 10cm, so that each section has several of these pseudobulbs on it.
Just a tip: the plant may separate naturally at points on the stem so gently pry it apart at first to see if these natural splits occur.
Ow you have to see which of the root/stem sections is all set to bloom. Look for sections that have new growth already sprouting from them. Plant each of these in pots of their own with your specialist orchid mix. The buds/pseudobulbs should show growth within a month or two. But don’t expect flowers until next year.
If you have pseudobulbs without any new growth attached, look for an “eye” on them. This is a green spot on the bulb. Plant these bits of the stem in a pot of sphagnum moss and keep them moist and humid but not wet. Keep watch to see if new growth sprouts from the eye. When this happens, move it to a regular orchid pot with its specialist orchid potting mix. Care for it as normal. (See How to grow and care for orchids.)
How to take cuttings from orchids
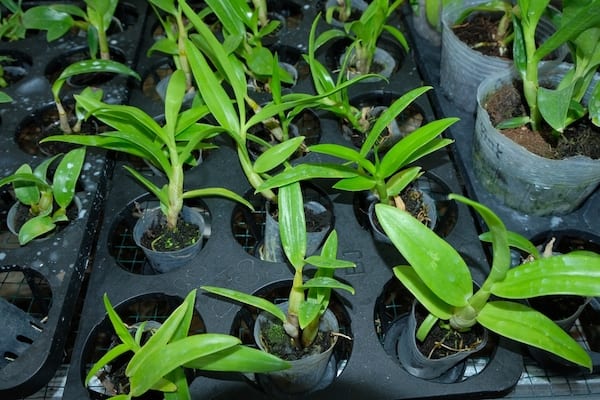
Some species of orchids, such as Dendrobiums and Phalaenopsis (the most popular orchids for the home) produce keikis. Keikis are small orchid shoots that develop a stem and some roots. Remove these easily from the parent plant and put them into their own orchid pot with orchid potting mix.
Care for these as normal and within two years you should have a fully grown plant. As these are an offshoot of the parent plant, your orchids will look exactly like the original flowers.
Another tip: you may want to leave the keikis where they are until they’re fully grown and then cut them off and repot them.
From seeds
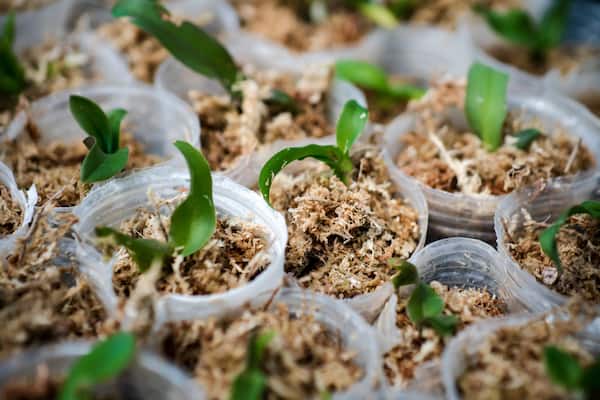
Orchid seeds, unlike other plants, don’t contain nutrients in their storage tissues. This means you have to provide the nutrition they need when they grow. Below is a brief summary of what growing orchid seeds entails, as detailed instructions are quite complex and beyond this article.
First of all, obtain clean orchid seeds, probably from buying them from a reputable source but you can use those you gather from your orchid itself. Then create a sterile but nutritious environment for the seeds to grow in. This entails developing a medium using agar (a jelly-like compound) and, adding in nutrients and growth hormones, then sterilising the whole thing.
In a sterile environment, put the seeds into this medium. Place this in indirect sunlight. When the seedlings have grown (this may take a long time), you need to transplant them into another pot with agar medium. And then later, when they’ve grown some more, into their planting pot.
With all this careful work, it takes months for the first leaves to appear, followed later by the roots. And there’s no sign of flowers for three to eight years.
If you’re wondering why anyone would propagate orchids for seeds, this is the only method that lets you develop hybrids; all the other propagation methods produce clones of the parent plant.
A final tip: see How to grow and care for your orchid for information about successfully growing your orchid once it’s propagated.